FreePBX IVR: Menus, Prompts, and Clean Customer Journeys
Screenshots + clean steps to configure this FreePBX module in a production-safe way.
FreePBX IVR: Menus, Prompts, and Clean Customer Journeys
An IVR (Interactive Voice Response) is your phone menu: “Press 1 for Sales, Press 2 for Support…” In FreePBX, IVR is built using: (1) a greeting recording + (2) DTMF key mappings + (3) safe fallbacks for invalid and timeout so callers never get stuck.
- Create IVR and select the Announcement (greeting prompt)
- Decide Direct Dial (allow extension dialing or keep it disabled)
- Set Timeout and retry behavior
- Define Invalid / Timeout destinations (escape path)
- Map Digits → Destination (Queue / Ring Group / Extension / Voicemail / Another IVR)
Where IVR Fits in Inbound Call Flow
Trunk (DID)
  → Inbound Route
      → (Optional) Time Condition (Open/Closed)
          → IVR (menu)
              → Queue / Ring Group / Extension / Voicemail / Operator
Best practice: Use a Time Condition before IVR when you have business hours. That keeps after-hours behavior separate (voicemail/announcement/callback) instead of forcing callers through menus when closed.
Open the IVR Module
Navigate to:
- Applications → IVR

0_Main, 1_Sales_Eng, 2_Support_Hindi) so routing stays clean.
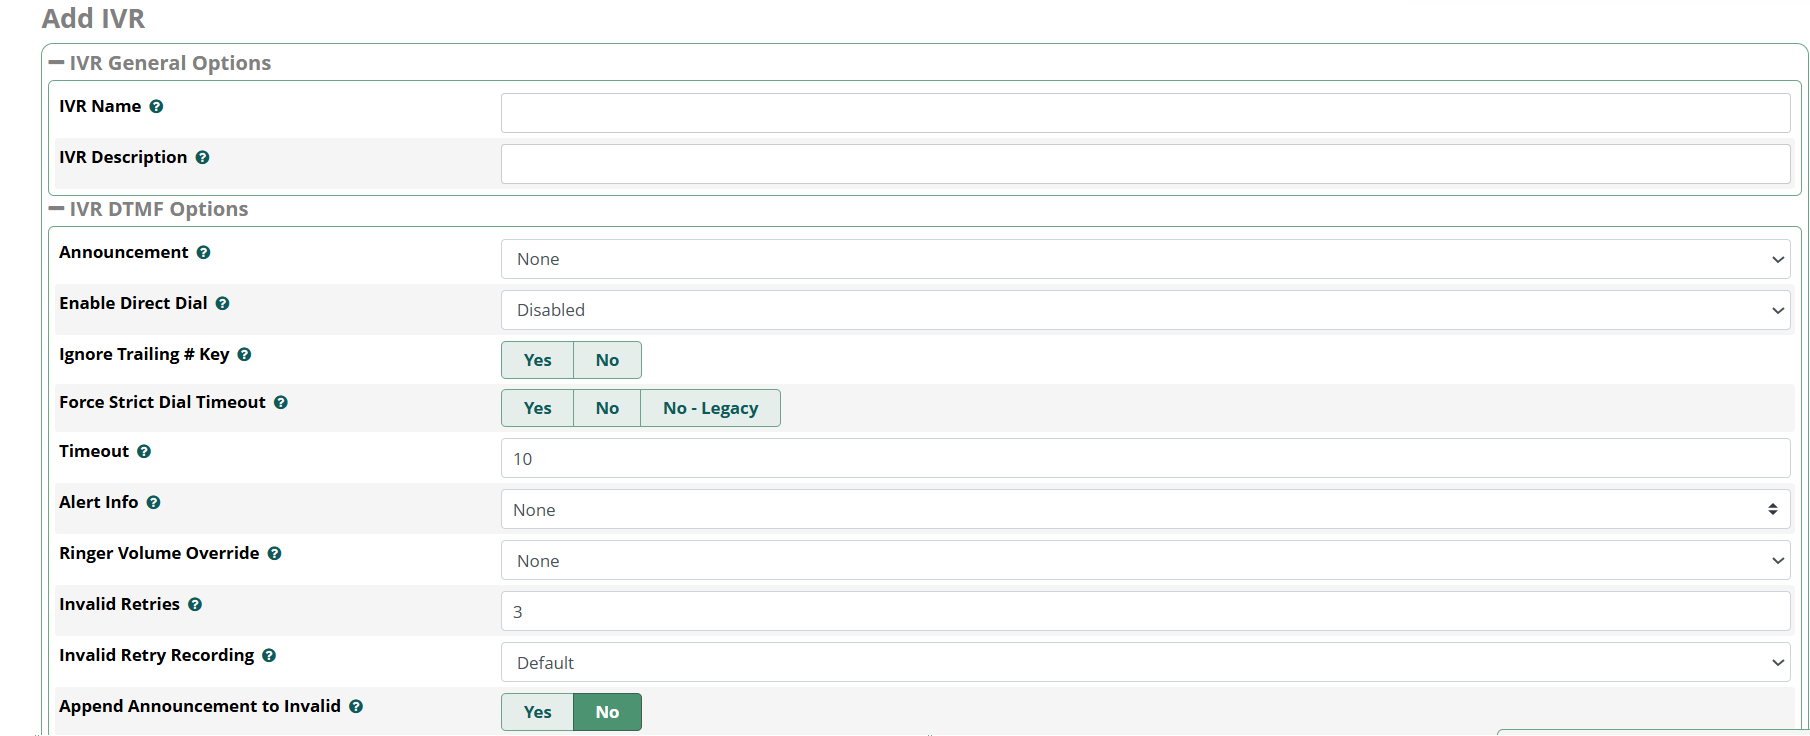
Step 1: IVR General Options (Name + Description)
After clicking Add IVR, the first section is IVR General Options. This is where you define what the IVR is called.
- IVR Name: internal identifier (example:
0_Mylinehub_multiLanguage,Main-IVR) - IVR Description: optional note for admins (example:
Main customer menu for inbound DID)
Step 2: IVR DTMF Options (Greeting + Input Behavior)
The next section is IVR DTMF Options. These fields decide what the caller hears and how keypresses are handled. The exact labels you see in your screen are shown in the screenshot.
Announcement (Greeting Prompt)
- Announcement: choose the recording that plays when the IVR answers.
- If you have “None”, create a recording first in Admin → System Recordings (or Announcements, depending on your setup).
- Keep the greeting short and action-based: “Press 1 for Sales, Press 2 for Support, Press 9 to repeat.”
Enable Direct Dial
- Enable Direct Dial: when enabled, callers can dial extension numbers during the IVR.
- For public customer IVRs: keep it Disabled to avoid extension-guessing and spam.
- For internal office IVRs: direct dial can be useful.
Ignore Trailing # Key
- Ignore Trailing # Key: many callers press
#after a digit (habit). - Yes makes the IVR more forgiving (recommended for most menus).
Force Strict Dial Timeout + Timeout
- Timeout: how long (seconds) the system waits for digit input.
- Force Strict Dial Timeout: controls strictness around input timing behavior.
- Typical customer IVR values: 5–10 seconds. (Your screenshot shows
10.)
Alert Info + Ringer Volume Override
- Alert Info: advanced interop header behavior (usually leave None unless you know why you need it).
- Ringer Volume Override: typically leave None; use only if you must override endpoint ring volume behavior.
Step 3: Invalid Handling (Wrong Key Press)
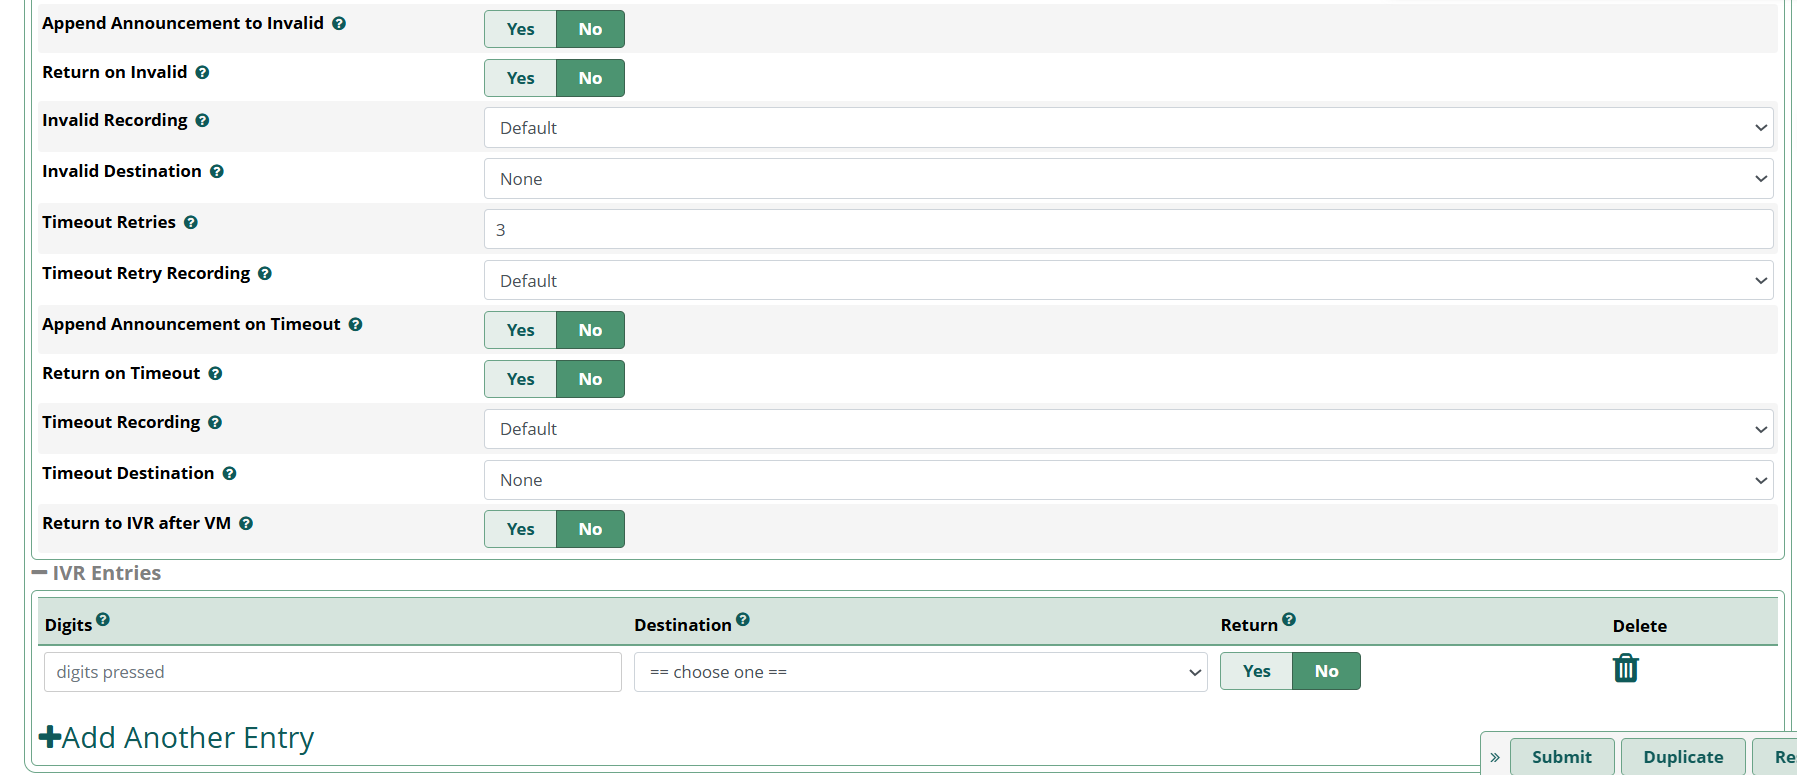
Invalid handling is what happens when callers press a key that you did not map in IVR Entries. This is critical for a “no-dead-ends” customer journey.
Fields shown under Invalid behavior
- Invalid Retries: how many times to allow invalid input before you stop repeating (example shown:
3). - Invalid Retry Recording: which recording to play on invalid (often “Invalid choice, please try again”).
- Append Announcement to Invalid:
- Yes = play the main greeting again after the invalid message
- No = only play invalid message (then follow invalid destination logic)
- Return on Invalid:
- Yes = return to IVR menu after invalid handling
- No = follow the invalid destination and exit the IVR
- Invalid Destination: where to send the call when invalid handling is done (important “escape path”).
Recommended production behavior
- Allow 1 repeat of the menu, then send to an Operator / Queue / Ring Group.
- Avoid infinite loops. Too many repeats = callers hang up.
Step 4: Timeout Handling (No Key Press)
Timeout handling is what happens when callers do not press anything. The fields shown in your screen let you control retries, playback, and the final destination.
Fields shown under Timeout behavior
- Timeout Retries: how many times to allow “no input” (example shown:
3). - Timeout Retry Recording: a recording like “Sorry, we didn’t get your input.”
- Append Announcement on Timeout:
- Yes = replay the main IVR greeting after timeout message
- No = do not replay greeting
- Return on Timeout:
- Yes = return to IVR menu after timeout handling
- No = follow timeout destination and exit IVR
- Timeout Recording: recording that plays when timeout occurs (often “Please make a selection.”)
- Timeout Destination: where to send callers when timeout handling is done (queue/operator/voicemail).
- Return to IVR after VM: if timeout/invalid sends to voicemail, decide whether to return back to IVR after voicemail completes.
Recommended production timeout behavior
- 1st timeout: replay menu once
- 2nd timeout: route to operator or a general queue
- Never loop forever
Step 5: IVR Entries (Digits → Destination)
The IVR Entries table is the actual menu mapping. Each row defines:
- Digits: what the caller presses (example:
1,2,9,0) - Destination: where that digit routes (Queue / Ring Group / Extension / Another IVR / Voicemail)
- Return:
- Yes = after the destination completes, return to the IVR (useful for “information” destinations)
- No = normal routing (most cases: Sales queue, Support queue, operator)
Common real-world IVR layout
1 → Sales Queue
2 → Support Queue
3 → Billing / Accounts Ring Group
0 → Operator / Reception
9 → Repeat menu (often routes back to same IVR)
Repeat option (Press 9)
- Create an entry
9and set Destination to the same IVR (or a “Repeat” IVR if you prefer). - Keep retries limited using timeout/invalid logic so it doesn’t trap callers.
Step 6: Save and Apply Configuration
When your IVR is ready:
- Click Submit
- Click Apply Config (top red/orange bar in FreePBX)
- Test with a real call (mobile phone) and confirm DTMF works
The bottom of your screen shows action buttons like Submit and Duplicate. Duplicate is useful when you want a similar IVR (example: English and Hindi) with the same structure but different prompts.
Troubleshooting: When IVR Digits Don’t Work
Caller presses digits, but nothing happens
- DTMF mode mismatch on trunk/provider (common)
- Codec/transcoding issues affecting RTP/DTMF relay
- Testing only from outside fails, but internal works → likely trunk/provider DTMF settings
Caller always goes to timeout destination
- Timeout value too short
- Caller presses during the greeting but system starts listening later
- Adjust greeting pacing and keep “Press 1/2/3” early and clear
IVR loops forever
- Invalid/Timeout destinations return back to same IVR repeatedly with high retries
- Fix: limit repeats, then route to operator/queue/voicemail
Production IVR Checklist
- Announcement selected and short
- Enable Direct Dial disabled for public menus (unless required)
- Ignore Trailing # enabled for user-friendliness
- Timeout set reasonably (commonly 5–10 seconds)
- Invalid Destination and Timeout Destination configured (escape path)
- IVR Entries mapped (Digits → Destination) and tested
- Submit + Apply Config done
- External testing completed (real mobile call)
Next best article after IVR is typically: Queues (agents + ring strategies + announcements) so “Press 1 for Support” routes into a proper call center flow.
Want to see API-driven CRM + Telecom workflows in action? Try the WhatsApp bot or explore the demos.
Comments (0)
Be the first to comment.