Reset Network for SIP in FreePBX: Fix NAT, RTP, and One-Way Audio
Screenshots + clean steps to configure this FreePBX module in a production-safe way.
Reset Network for SIP in FreePBX: Fix NAT, RTP, and One-Way Audio
FreePBX provides a fast way to “reset” or re-apply network-related SIP settings when your PBX suddenly starts showing symptoms like:
- One-way audio (caller hears agent, but agent can’t hear caller)
- No audio even though calls connect
- Calls drop after 10–30 seconds
- External calls fail but internal extension-to-extension works
- Wrong Contact / wrong public IP in SIP signaling
This guide shows how to use the FreePBX “Detect Network Settings” approach (and what to check before/after) so your NAT, RTP and firewall alignment becomes stable again. This is automated feature and detects by just click on this one button.
Before You “Reset”: Understand the Real Root Cause
Resetting network settings is not magic. It helps when configuration is inconsistent (changed IP, changed router, wrong detected external address, or mismatched local networks). But the real fixes usually involve:
- Correct External Address (public IP or DDNS host)
- Correct Local Networks (LAN subnets that should be treated as “internal”)
- Correct RTP Port Range opened on firewall/router
- SIP ALG disabled on router (common cause of random issues)
Think of this as: “make FreePBX re-learn its networking identity and re-apply firewall rules cleanly.”
Where This Setting Lives in FreePBX
In FreePBX 16/17, network-related options typically sit as well under:
- Settings → Asterisk SIP Settings (NAT, RTP, Codecs)
- Connectivity → Firewall (allowed services, trusted networks)
- Admin → System Admin / Network (interface/IP/DNS if SysAdmin is installed)
When you use “Detect Network Settings”, the goal is to re-align these pieces so Asterisk and the firewall are consistent.
Step-by-Step: Reset Network for SIP (Screenshot Walkthrough)
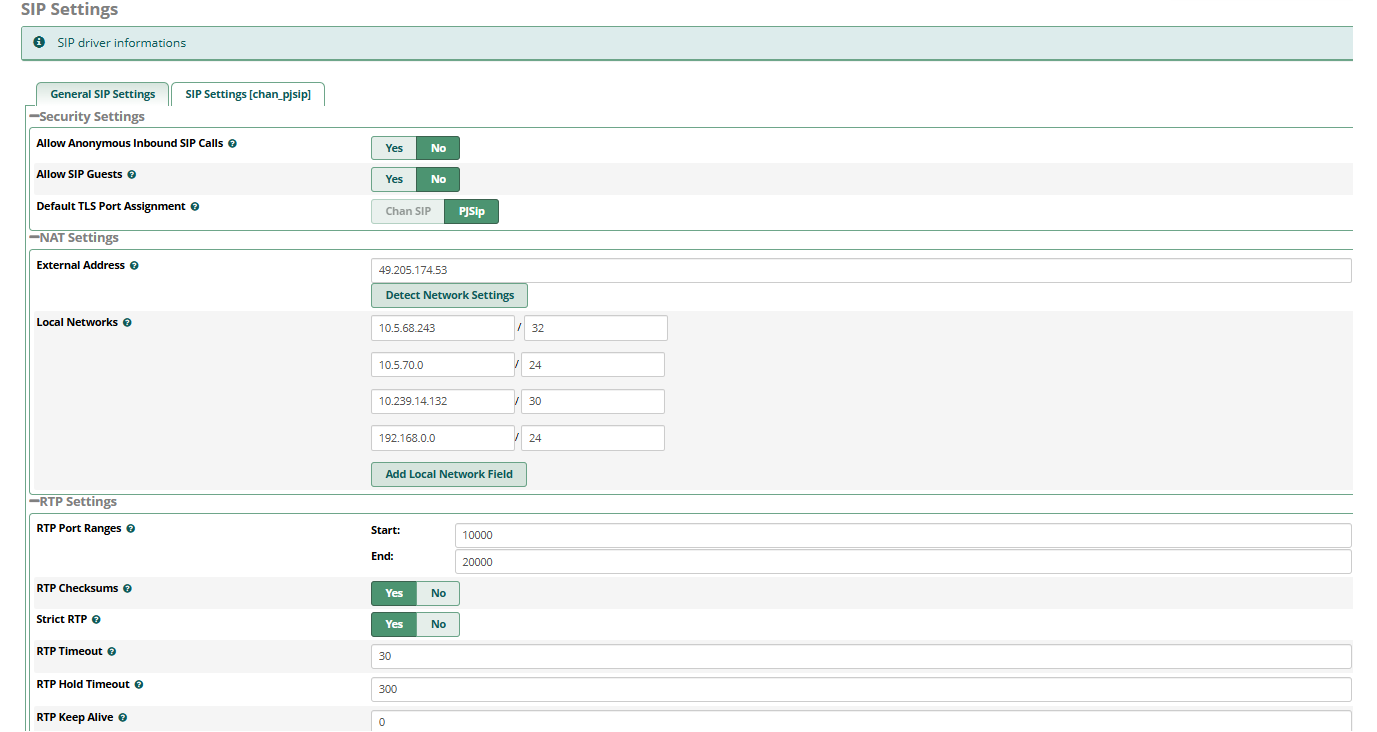
- Open the SIP/NAT section (usually in Asterisk SIP Settings).
- Use the “Reset Network” option (wording may differ slightly by FreePBX version/module).
- Save / Submit the settings.
- Click Apply Config so Asterisk reloads with corrected network identity.
- If your system uses the FreePBX Firewall module, also verify firewall rules remain correct after applying.
What “Detect Network Settings” Actually Fixes
Depending on version, this typically helps FreePBX/Asterisk re-apply (or correct) values like:
- External Address: The public IP/host Asterisk should advertise in SDP and Contact headers for outside devices.
-
Local Networks:
Subnets that should be treated as “inside NAT” (e.g.
192.168.0.0/24). - NAT flags: Ensures Asterisk sends RTP correctly and expects media from the right side.
- Firewall alignment: Makes sure SIP/RTP services match the actual port ranges you configured.
It’s especially useful after:
- Changing ISP / router
- Moving FreePBX to a new server
- Public IP changed (dynamic IP without DDNS)
- Local subnet changed (e.g., from
192.168.1.xto192.168.0.x) - Firewall policies were edited and you want a clean re-sync
Post-Reset Checklist (Do This Immediately)
1) Confirm External Address
- If you have a static IP, set it as External Address.
- If you have dynamic IP, use a DDNS hostname and ensure it updates correctly.
- Wrong external address = SDP will point media to a wrong IP → one-way/no audio.
2) Confirm Local Networks
Add your LAN ranges properly. Example:
192.168.0.0/24
10.0.0.0/8
If local networks are missing, Asterisk may treat internal devices as “external” and apply NAT logic incorrectly.
3) Confirm RTP Port Range and Firewall
- Check your RTP range in SIP settings (common defaults are
10000-20000). - Ensure those UDP ports are allowed on server firewall and router port-forward if needed.
4) Disable SIP ALG on Router
SIP ALG frequently rewrites SIP packets and breaks NAT traversal. If you see random audio issues or intermittent call failures, SIP ALG is a prime suspect.
Quick Tests After Reset
Test A: External Call Audio Test
- Call your DID from a mobile network (not Wi-Fi).
- Answer on an extension.
- Verify both sides hear audio clearly.
Test B: RTP Path Validation
If one-way audio remains:
- Run a packet capture (tcpdump) for RTP ports while call is active.
- Confirm RTP packets are arriving on expected port range.
- Check if RTP is being sent to a private IP in SDP (wrong external address symptom).
Common Mistakes That Make Reset “Look Like It Didn’t Work”
- Firewall module still blocking: You reset SIP settings but FreePBX Firewall still doesn’t trust your admin IP / provider IP.
- RTP ports not opened: SIP works (call connects) but RTP is blocked (no audio).
- Double NAT: PBX behind one router and that router behind another router → tricky NAT.
- ISP CGNAT: No real public IP; inbound RTP fails unless you use VPN/SBC or proper hosting.
Recommended Production Setup
- Static public IP for the site (or DDNS if unavoidable)
- Disable SIP ALG
- Open only required ports (SIP + RTP ranges, ARI/AMI if required)
- FreePBX Firewall enabled with Trusted Networks set correctly
- Consistent NAT config for endpoints and trunk providers
If you are integrating with MYLINEHUB VoiceBridge (ARI/AMI), network stability is even more important because: intermittent NAT issues create “ghost calls”, stuck channels, and inaccurate reporting.
Want to see API-driven CRM + Telecom workflows in action? Try the WhatsApp bot or explore the demos.
Comments (0)
Be the first to comment.