FreePBX SIP Settings: NAT, RTP Ports, and Codec Choices
Screenshots + clean steps to configure this FreePBX module in a production-safe way.
FreePBX SIP Settings: NAT, RTP Ports, and Codec Choices
If your calls connect but audio is missing, audio is one-way, calls drop after a few seconds, or WebRTC/softphones behave randomly, FreePBX SIP Settings is where you fix the foundation.
This guide is written for FreePBX 16/17 (Asterisk 18/20) with chan_pjsip, and maps every major step directly to the screenshots in this page.
- Security + NAT: External Address, Local Networks, guest/anonymous toggles
- RTP: Port range and timeouts (the #1 “no-audio” cause)
- WebRTC/ICE + STUN/TURN: what to fill and when
- Codecs: keep it small to avoid transcoding surprises
- PJSIP Misc + Transports: UDP/TCP/TLS/WS/WSS, TLS cert selection
After these settings are correct, your Trunks, Extensions, Inbound Routes, IVR, Queues, and ARI/AMI integrations (like MYLINEHUB VoiceBridge) become much more stable.
Where to Find SIP Settings in FreePBX
Go to:
- Settings → Asterisk SIP Settings
Depending on your FreePBX build, you will see multiple sections/tabs like: Security, NAT, RTP, WebRTC, Codecs, PJSIP, Transports, TLS/SSL/SRTP, etc.
A Simple Mental Model (Why These Settings Break Audio)
SIP calling is two different flows:
- SIP signaling (INVITE / 200 OK / BYE): usually port
5060(UDP/TCP) or5061(TLS) - RTP media (actual voice): a range of UDP ports (example
10000–20000)
Common symptom mapping:
- Call connects, no audio → RTP ports blocked OR wrong public address advertised in SDP
- One-way audio → NAT/Local Networks incorrect OR asymmetric routing
- Call drops after ~15–30 sec → NAT timers / keep-alive issues / firewall pinholes closing
- WebRTC connects, no audio → ICE/STUN/TURN missing OR WSS/SRTP/DTLS mismatch
Step 0: Security Settings (Do This Before NAT)
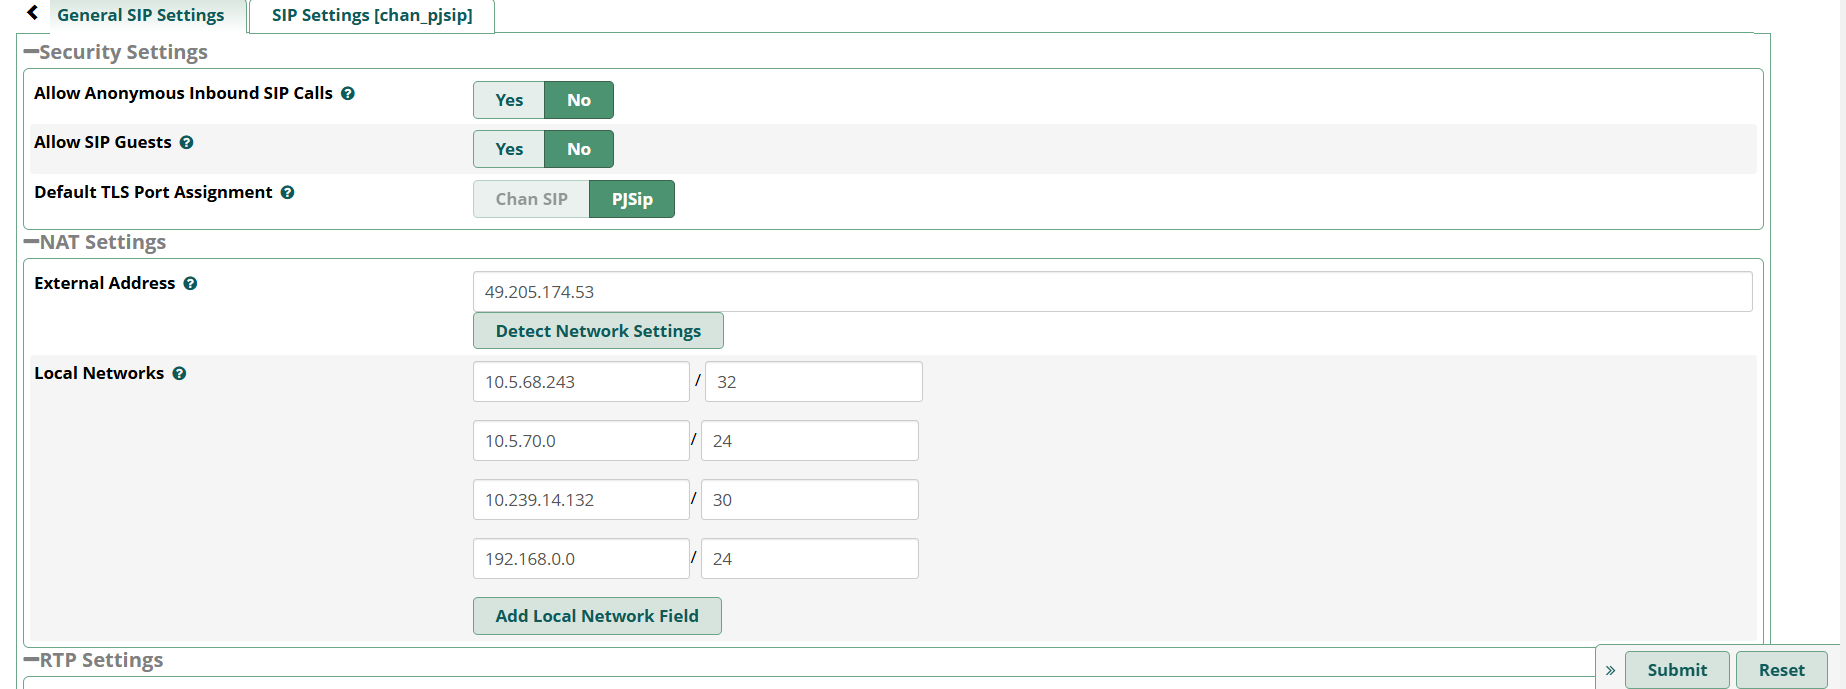
In production, you should not allow random SIP endpoints to hit your PBX. Most PBX hacks start with open SIP. Use the security toggles in SIP Settings and pair them with FreePBX Firewall rules/trusted IPs.
Recommended safe defaults
- Allow Anonymous Inbound SIP Calls: No (keep it closed unless you have a very specific reason)
- Allow SIP Guests: No (avoid unauthenticated endpoints)
- Default TLS Port Assignment: keep PJSIP if you use TLS on chan_pjsip
If you truly need a trunk that arrives “anonymous”, do it safely: create a proper pjsip identify match for the provider IP(s) and accept only from those IP ranges.
Step 1: NAT External Address (Most Important)
- Refer above imageIf your server is behind NAT (office router / cloud firewall / VPS with private interface), Asterisk must know what public address to advertise to the outside world. If this is wrong, the far end will send RTP to the wrong IP → silent audio / one-way audio.
What to set
-
External Address:
- If you have a static public IP, set it directly.
- If your IP changes, use a DDNS hostname (and ensure it updates correctly).
- Detect Network Settings: This can help, but in production a known static IP/DDNS is more predictable.
Reality check: External Address impacts what Asterisk writes into SDP. If SDP advertises a private IP (like 192.168.x.x), your provider/remote phone will send RTP there and you’ll hear nothing.
Step 2: Local Networks (Tell Asterisk What Is “Inside”)
- Refer above imageLocal Networks is where you define your internal LAN subnets. Asterisk uses this to decide when to apply NAT rewriting and how to treat contacts.
Correct way to add Local Networks
- Use subnets (like
192.168.0.0/24) not just one host IP. - Include VPN subnets if your remote phones connect over VPN.
- Include all internal ranges that can register phones or talk to the PBX.
Common mistake
- People add
192.168.0.10/32(single device) and forget the actual LAN subnet. - They forget cloud/VPN ranges, so endpoints get treated “external” and NAT decisions become wrong.
Step 3: RTP Settings (Audio Must Have Open Ports)
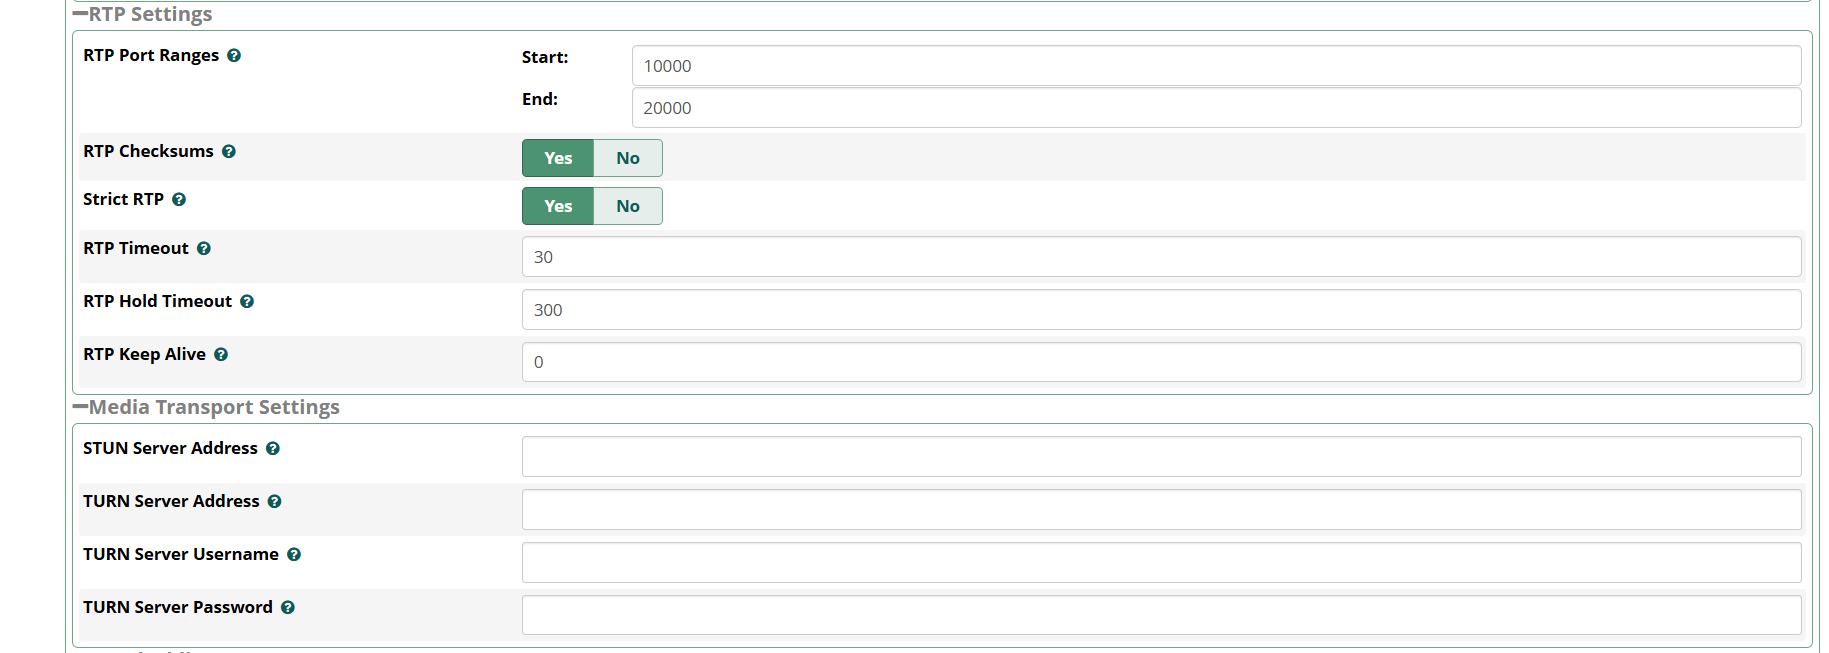
RTP is the actual voice stream. If your RTP ports are blocked on the server firewall, FreePBX firewall, or your router/security group, calls will connect but audio will be silent or one-way.
Recommended RTP baseline
- RTP Port Range: keep a standard documented range like
10000–20000 - RTP Timeout:
30is common (drop calls if no RTP for 30 seconds) - RTP Hold Timeout:
300(hold state can be longer) - RTP Keep Alive:
0means disabled (enable only if you understand the need)
Firewall ports you must allow (minimum)
UDP 5060        (SIP over UDP, if used)
TCP 5060        (SIP over TCP, if used)
TCP 5061        (SIP TLS, if used)
UDP 10000-20000 (RTP audio media)
If you use FreePBX Firewall module, ensure the services for SIP/RTP are enabled and the correct zones/trusted IPs are set.
Step 4: Media Transport (STUN/TURN) + ICE (WebRTC/Hard NAT Cases)
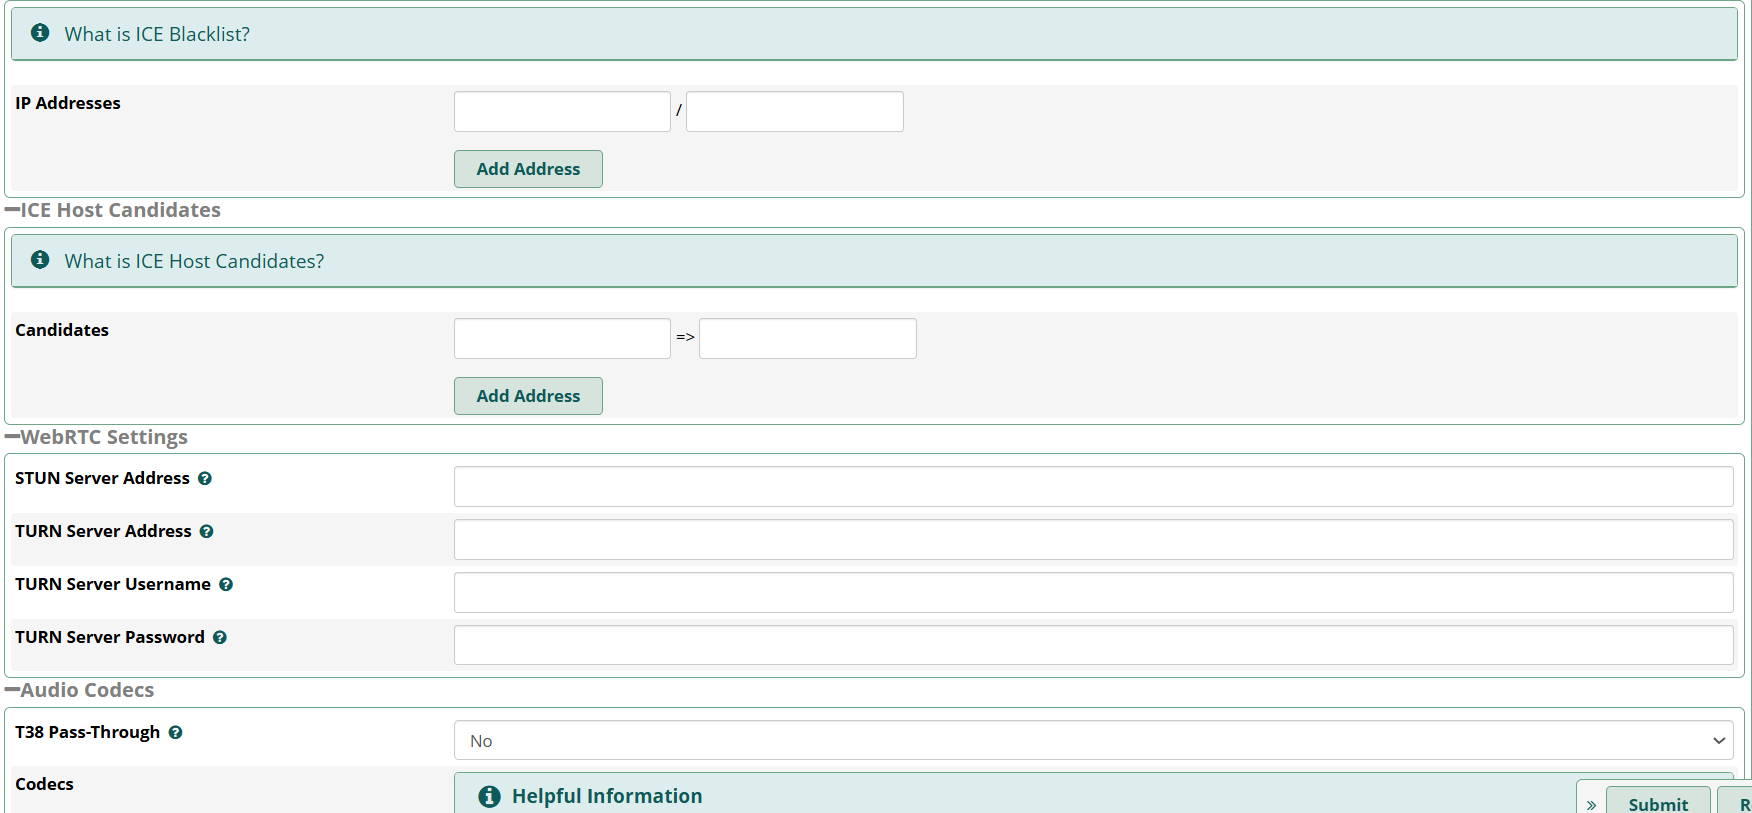
For most classic SIP trunks + desk phones, you can leave STUN/TURN blank. But for WebRTC or difficult NAT environments, these fields become important.
When you need STUN/TURN
- You are using browser calling (WebRTC) over the internet.
- Your users are behind restrictive NAT where direct UDP hole-punching often fails.
- You see “connected” calls but media never flows unless both are on same LAN/VPN.
Practical guidance
- STUN helps a client discover its public mapped address.
- TURN relays media when direct peer-to-peer cannot happen (more reliable, costs bandwidth).
- For production WebRTC, you usually want a TURN server available (even if not always used).
ICE Blacklist / ICE Host Candidates
- ICE Blacklist: block specific IPs/subnets from being offered as ICE candidates (rarely needed). Example use: prevent private subnets from being advertised to public clients.
- ICE Host Candidates: manual mapping of internal→external candidates. Most setups keep this empty unless you have a special multi-interface NAT scenario.
Step 5: Audio Codecs (Keep It Small to Avoid Transcoding)
Codecs decide the audio format negotiated between endpoints and trunks. The more codecs you enable, the higher the chance of: wrong negotiation, unexpected transcoding, and CPU usage spikes.
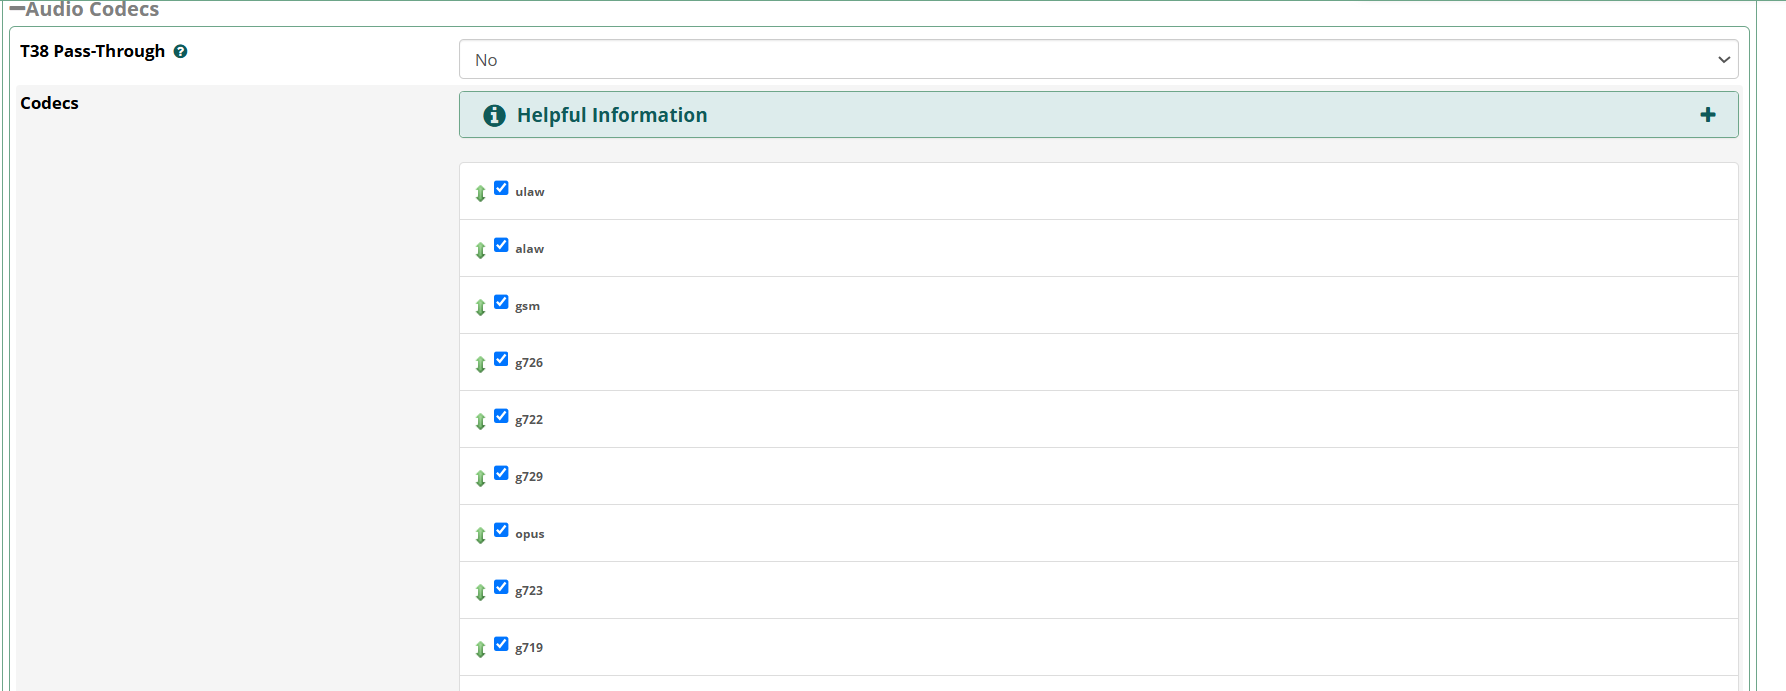
Recommended codec strategy
- For PSTN / SIP trunks: use G.711 only (PCMU/PCMA). It is the safest and most compatible.
- For WebRTC endpoints: use Opus first (best quality), then G.711 fallback.
- Avoid “enable everything” unless you have a clear requirement from a provider or legacy device.
Practical minimal sets
Classic SIP trunk only (recommended):
ulaw (PCMU)
alaw (PCMA)   (optional, depending on trunk/provider)
WebRTC + SIP trunk (recommended):
opus
ulaw (PCMU)
alaw (PCMA)
If your trunk forces a compressed codec (rarely ideal), enable only what is required.
Example: some providers require g729 (then you must ensure licensing/codec availability).
Codec order matters
- Put Opus at the top for WebRTC endpoints.
- Put PCMU/PCMA at the top for PSTN/trunks if you are not using WebRTC.
Step 6: Video Codecs (Optional)
If you are not doing video calling, you can disable video to reduce negotiation complexity. If you do need video, keep it limited to modern codecs.
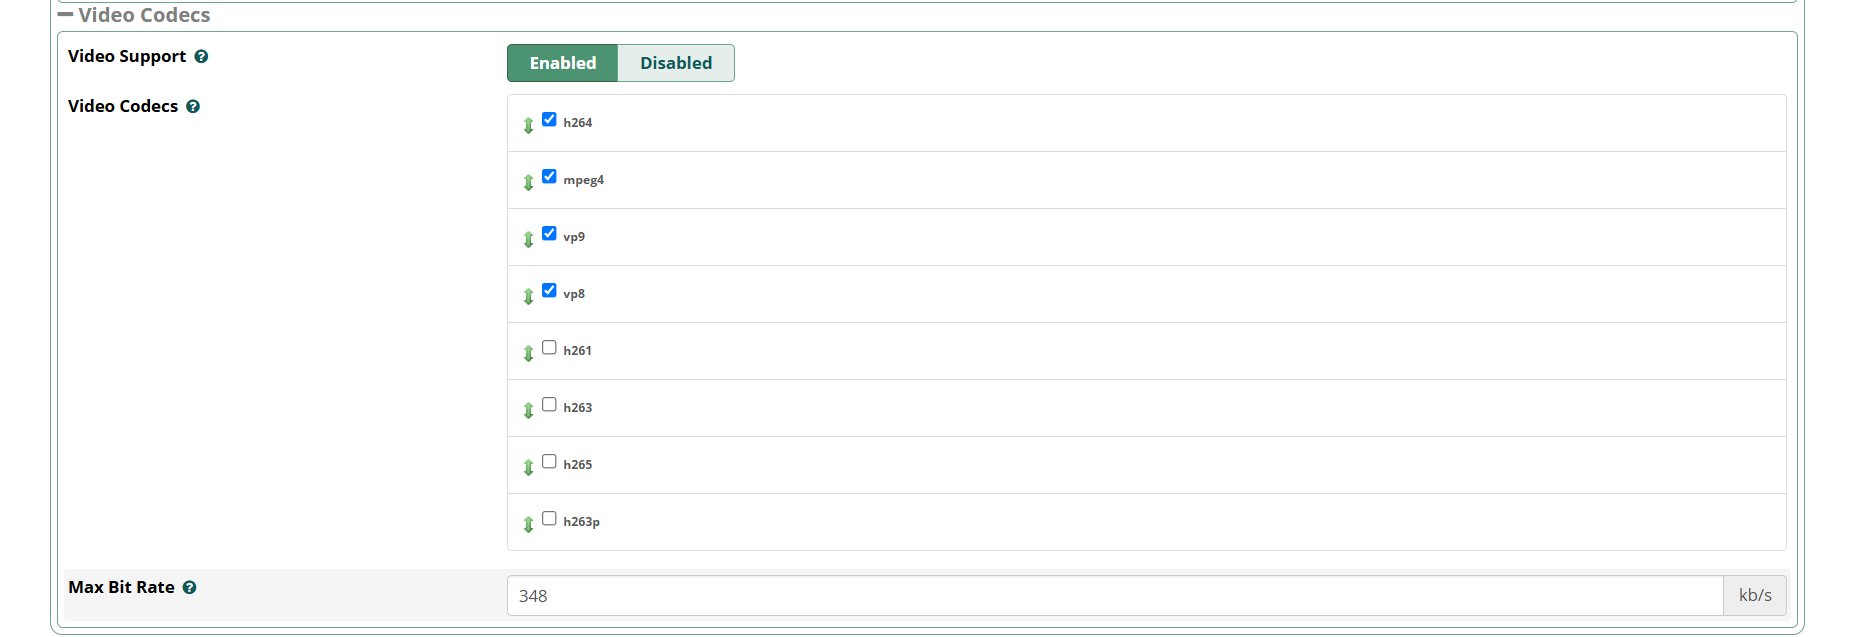
Recommended video approach
- If unused: Disable Video Support.
- If used: prefer h264 (most compatible), keep the list small.
- Max bitrate depends on your network; keep it conservative if calls happen over mobile networks.
Step 7: PJSIP Misc Settings + TLS/SSL/SRTP
These settings affect stability (keep-alives), troubleshooting (debug), overload protections, endpoint matching, and TLS certificate selection.

Recommended baseline
- Enable Debug: No (turn on only during troubleshooting)
- Keep Alive Interval:
90seconds is a common stable value - Caller ID into Contact Header: usually No unless you have a specific interop reason
- Show Advanced Settings: enable temporarily if you need deeper tuning
Endpoint Identifier Order (very important in real trunks)
- If you use IP-auth trunks/providers, keep ip early in the list. This helps Asterisk match inbound INVITEs by source IP quickly.
- If you use registration-auth endpoints, username/auth_username becomes important.
TLS/SSL/SRTP
- Certificate Manager: select the correct domain certificate used for TLS/WSS
- SSL Method:
tlsv1_2is a safe baseline - Verify Client: usually No unless you do mutual TLS
- Verify Server: usually No unless you control the far-end CA requirements
If you enable TLS but forget to select the correct certificate, you’ll see handshake failures and clients won’t connect.
Step 8: Transports (UDP/TCP/TLS/WS/WSS) and What to Enable
Transports define how SIP signaling reaches Asterisk: UDP/TCP/TLS for classic SIP, and WS/WSS for WebRTC signaling.
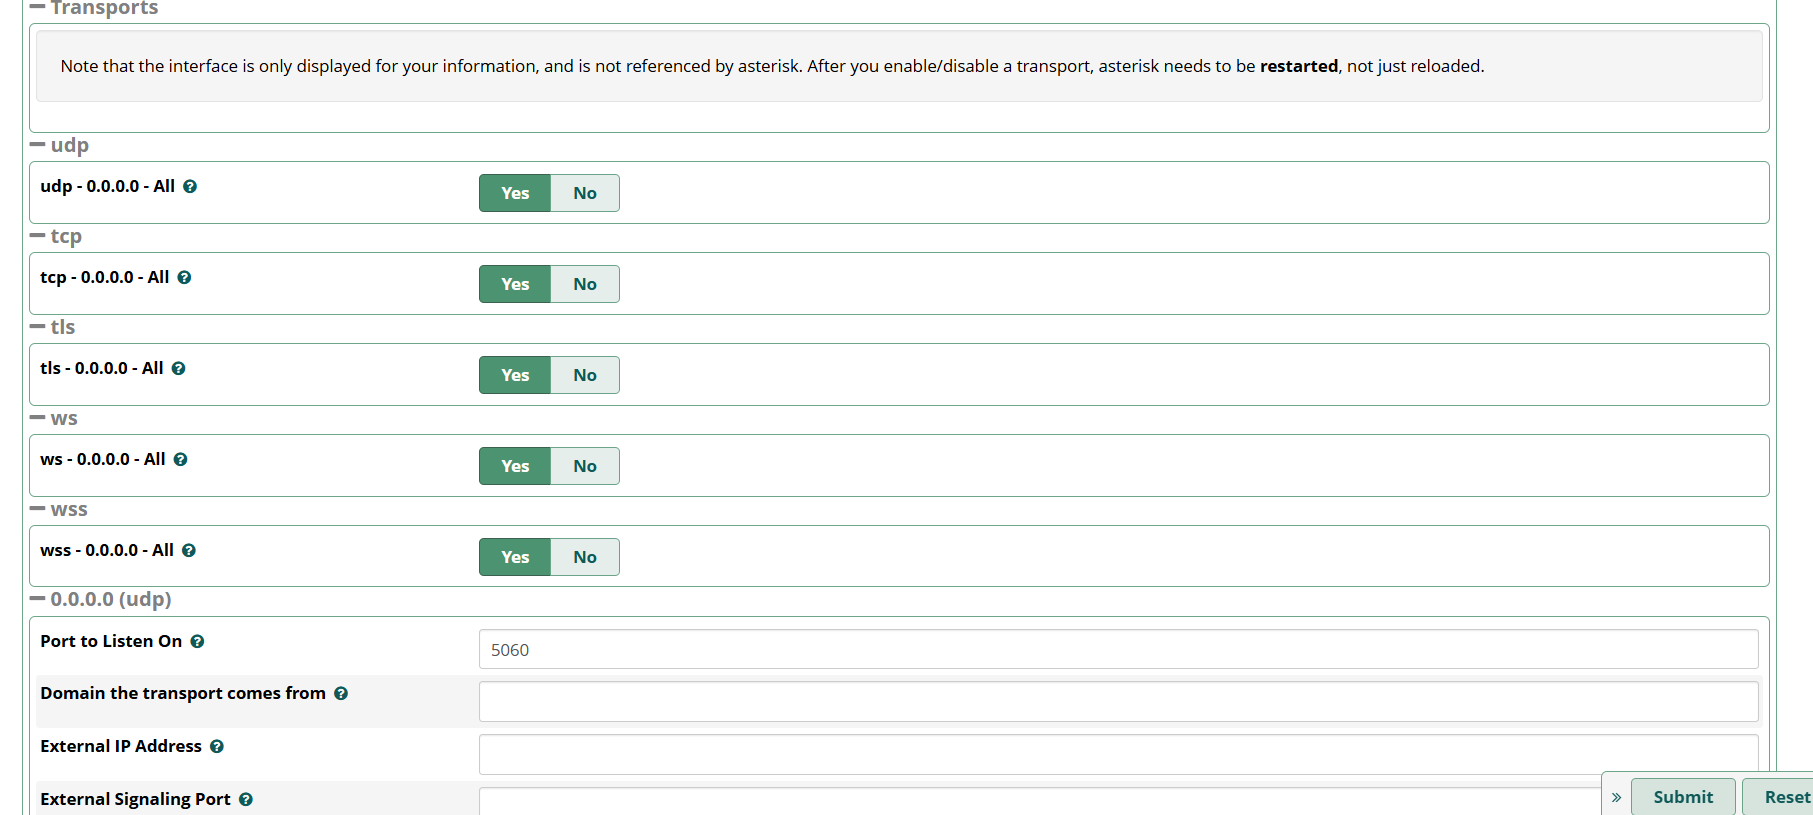

Recommended transport strategy
- Most SIP trunks: UDP 5060 only (simple and compatible)
- Enterprise/strict networks: TCP 5060 sometimes preferred
- TLS SIP: TLS 5061 (only when you have TLS endpoints and correct certs)
- WebRTC: WSS (secure websockets) is usually required for browsers
Important note about restart
The Transports screen usually warns that after enabling/disabling a transport, Asterisk needs to be restarted (not just “Apply Config”). Plan a quick maintenance window when changing transports in production.
Step 9: Apply Config + Validate (CLI Checks That Save Hours)
After changes:
- Click Submit / Save
- Click Apply Config
- If you changed Transports: do a controlled restart of Asterisk
Useful validation commands
asterisk -rvvv

; Confirm PJSIP is up and transports exist
pjsip show transports

; Confirm NAT/external address style settings (varies by FreePBX version)
pjsip show settings

; Show endpoints and what codec lists they advertise
pjsip show endpoints

; Debug RTP only when needed (disable after)
rtp set debug on
rtp set debug off
Packet-level truth (when you suspect NAT)
- sngrep (best for SIP dialogs)
- tcpdump (best for confirming RTP packets actually arrive/leave)
apt install -y sngrep
sngrep

; RTP capture example (adjust interface and port range)
tcpdump -ni any udp portrange 10000-20000
Production Checklist (Use This Every Deployment)
- Security: Anonymous + Guests = No (then allow only trusted IPs / authenticated endpoints)
- External Address: correct public IP/DDNS (matches what the world sees)
- Local Networks: correct subnets (LAN + VPN)
- RTP Ports: allowed end-to-end (server firewall + FreePBX firewall + router/security group)
- Codec list: minimal + ordered (avoid transcoding)
- WebRTC: if used, WSS + Opus + STUN/TURN planning is done
- Transports: only what you use; restart Asterisk after changes
- SIP ALG: disabled on routers (very common cause of broken SIP)
Troubleshooting Quick Map
- Call connects, no audio: RTP blocked OR wrong External Address advertised in SDP.
- One-way audio: Local Networks missing OR NAT mismatch on one side.
- Calls drop after ~15–30 seconds: NAT pinholes closing; check keep-alives and firewall timers.
- WebRTC connects but no audio: ICE/STUN/TURN/WSS/SRTP mismatch; verify Opus and NAT correctness.
Next supporting articles that connect well to this page: FreePBX Firewall (trusted networks + services), Router SIP NAT / SIP ALG, and WebRTC on FreePBX (WSS + certificates + TURN server setup).
Want to see API-driven CRM + Telecom workflows in action? Try the WhatsApp bot or explore the demos.
Comments (0)
Be the first to comment.