Connecting a MYLO Telephony Appliance: The Two-Cable Setup
Connecting the MYLO box is a short physical journey: prepare the site, connect the office or Internet-side Ethernet cable, connect the telecom-side cable when the provider supplies a separate path, attach power, wait for startup, and open MYLO from a browser on the office network.
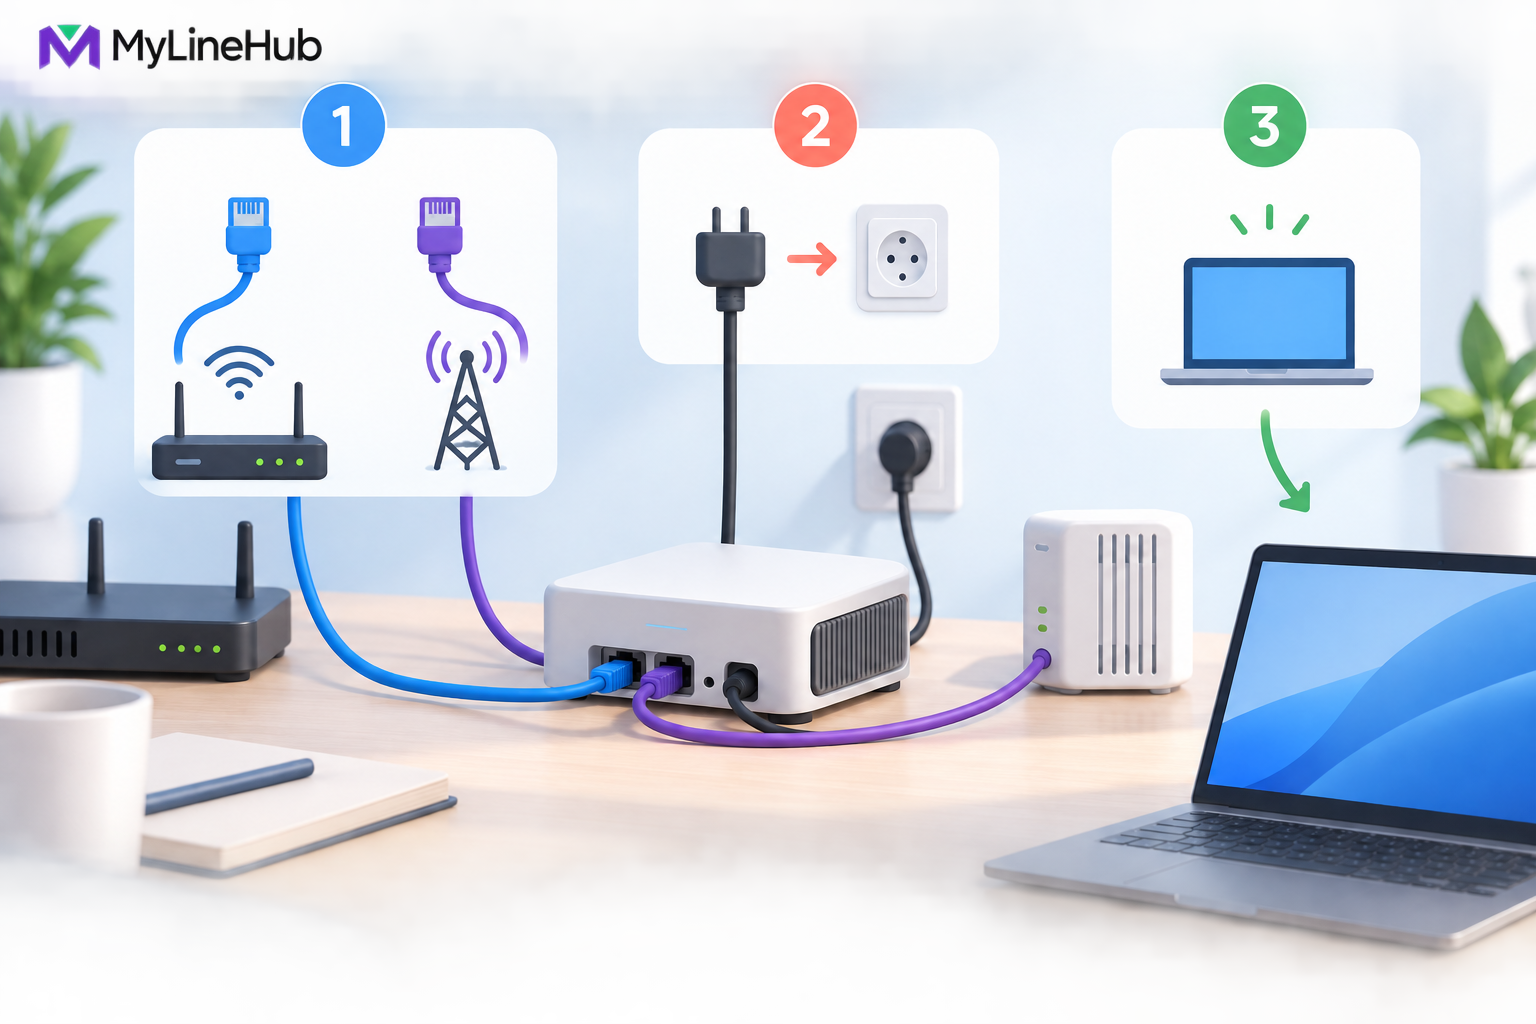
Connecting the MYLO box is a short physical journey: prepare the site, connect the office or Internet-side Ethernet cable, connect the telecom-side cable when the provider supplies a separate path, attach power, wait for startup, and open MYLO from a browser on the office network. These steps establish the appliance’s physical connections; they do not by themselves complete a working phone system. The SIP trunk, numbers, routes, users, caller IDs, and audio path still need to be configured and verified against the provider’s current information. Because provider topologies vary, the second cable may lead to carrier equipment in one office while another deployment carries telecom service over the main network. Follow the labelled ports and approved site plan rather than assuming that every installation is identical.
Before Connecting Anything
Choose a stable, ventilated location where the appliance cannot be knocked, covered, or unplugged casually. Keep it near the required network and power equipment, but avoid placing it where heat, moisture, dust, or tightly bent cables can shorten hardware life. Make sure the router, switch, provider termination equipment, and UPS have suitable capacity.
Gather the MYLO documentation and the provider’s trunk document. Identify which appliance port is intended for the office network and which is intended for a telecom-facing connection. Also identify the far end of each cable. A cable described only as “the blue one” will be difficult to support later; label its role at both ends.
Do not connect unknown networks together as an experiment. A provider link may use private addressing or routing that conflicts with the office LAN. If the site plan is missing or the carrier information is unclear, pause and obtain it before changing router or interface settings.
Step One: Connect the Internet or Office-Network Cable
Connect the designated office-side MYLO port to the correct office switch or router LAN port. This is normally the path used by an authorised administrator to open MYLO in a browser. It may also provide access to approved external services according to the deployment’s firewall and routing policy.
Use a sound Ethernet cable with intact connectors. A link indicator can help confirm a physical connection, but it cannot confirm a usable address, correct gateway, or browser access. If the office uses managed switches, VLANs, access controls, or reserved addresses, the network administrator should confirm that the selected switch port is prepared for MYLO.
Do not connect the office-facing port to a public WAN socket merely because both use an RJ45 connector. The expected connection is defined by the site’s network plan, not the connector shape.
Step Two: Connect the Telecom Cable
When the SIP provider delivers a separate network or termination device, connect the telecom-side MYLO port to the port identified by the provider or installer. This connection can carry provider signalling and media according to the supplied topology.
Confirm whether the carrier expects static addressing, a private gateway, specific routes, registration credentials, or source-IP authorisation. These are configuration facts, not values that can be discovered safely by guessing. Store sensitive credentials only through the approved protected mechanism.
Some providers deliver SIP service over the ordinary Internet connection. In such a deployment, there may be no separate provider cable. Leave unused interfaces as directed by the approved plan; do not invent a use merely because a second port exists.
Step Three: Connect Power and Start the Appliance
Connect MYLO to the supplied or approved power arrangement and, where planned, to a correctly sized UPS or inverter. The rest of the call chain matters too: the router, switch, carrier device, and powered phones may all need backup. Protecting only the appliance will not preserve calls if the network disappears during an outage.
Start the appliance and allow it to complete its normal boot process. Avoid repeated power cycling because a browser page does not appear immediately. Startup includes the operating system and application services, and the exact time can vary. Observe documented status indicators rather than forcing a restart without evidence.
Step Four: Find MYLO on the Office Network
The office-side interface needs an address reachable from the administrator’s computer. In many small networks, the router assigns an address automatically. An authorised administrator can check the router’s connected-device or DHCP-client list and identify the appliance using the documented device information. In a managed network, the address may already be assigned under the site plan.
Enter the confirmed local address in a supported browser from a computer on the appropriate network. Do not rely on a provider-specific screenshot or assume every router uses the same menu. If the address is not visible, check the cable, switch port, computer network, VLAN, and live interface state before changing settings.
Step Five: Open MYLO and Protect the First Login
When the MYLO page opens, follow the approved first-administrator journey. Use a strong, unique password and keep the login available only to the responsible person. The first administrator becomes the owner of user management, approvals, and other consequential actions, so the account should not be treated as a shared convenience login.
Browser access proves that the office-side network and web application are reachable. It does not prove that the SIP trunk is active or that an external call will have two-way audio. Treat it as one completed checkpoint in a larger installation.
Connection Is Not the Same as Telecom Configuration
After both cables and power are in place, MYLO still needs accurate provider and business information. The trunk may require authentication, server addresses, codecs, number presentation, inbound DID representation, and provider-specific routing. The business must define its users, extensions, departments, inbound destinations, and approved outbound behaviour.
MYLO can guide the administrator through supported work, ask for missing information, and prepare a structured proposal. Consequential changes remain subject to permissions, validation, and approval. Asterisk performs the live telephony work, while the operating system remains the authority for actual interface and route state.
A Practical Two-Cable Example
A ten-person office places MYLO beside a managed switch, broadband router, carrier termination device, and UPS. A labelled “Office LAN” cable runs from MYLO’s office port to the switch. A labelled “SIP Provider” cable runs from its telecom port to the carrier device. The router list reveals the office-side address, and the administrator opens MYLO from a laptop on the same authorised network.
The installer then enters the approved provider details through the supported setup process, configures a representative extension and inbound route, and tests a real call. The first attempt signals correctly but has one-way audio. Rather than swapping both cables, the technician inspects the media route on the telecom path and corrects the specific configuration. Clear labelling keeps the diagnosis focused.
If MYLO Does Not Appear in the Browser
- Confirm that the appliance has power and has completed startup.
- Check that the office cable is connected to the intended MYLO and switch ports.
- Look for physical link indicators without treating them as proof of full connectivity.
- Confirm that the administrator’s computer is on the correct office network or VLAN.
- Review the router or network-management list for a newly connected device.
- Use live system evidence to confirm the interface address when authorised support is required.
- Avoid factory resets, random static addresses, or router changes that could create a wider outage.
If the browser works but calling does not, move the investigation to provider activation, trunk status, routes, number format, firewall behaviour, and media. Do not erase a working office connection while troubleshooting a different layer.
Installation Responsibilities
- Customer: provides a suitable location, network, power protection, authorised administrator, endpoints, and provider contract.
- Telecom provider: supplies and activates the agreed trunk, numbers, channels, routing information, and escalation path.
- MYLO: provides the prepared appliance and supported management journey within its product boundary.
- Installer or network specialist: applies the approved site design and verifies the complete path without exposing credentials.
Custom VLANs, unusual carrier links, multi-site routing, public remote access, and bespoke integrations may need separately scoped work. They should not be assumed to be included merely because the physical box has two Ethernet ports.
Two-Cable Go-Live Checklist
- Place MYLO in a ventilated, protected location.
- Label the office-side and telecom-side cables at both ends.
- Confirm the purpose and destination of each port.
- Connect all required equipment to suitable power backup.
- Record the office-side address through an approved method.
- Create and protect the first administrator account.
- Enter only provider-confirmed trunk and routing information.
- Configure a representative user and route through the supported workflow.
- Test inbound and outbound calls, number presentation, DTMF where relevant, recording where approved, and two-way audio.
- Keep a simple network record for future support.
For the design rationale, read why MYLO uses two network ports. Next, see how to find and open MYLO on the office network. Contact MyLineHub for a custom implementation when the site does not match a standard connection journey.
Continue planning
Continue with What Is a Telephony Appliance for a Small Business?; Why a MYLO Appliance Uses Two Network Ports; How to Find and Open MYLO on Your Office Network. For deeper implementation context, use MyLineHub technical architecture guidance.
Review current MYLO pricing, or discuss this requirement on WhatsApp.
Want to see API-driven CRM + Telecom workflows in action? Try the WhatsApp bot or explore the demos.
Comments (0)
Be the first to comment.